JavaScript Developer Quickstart
Welcome to the JavaScript Quickstart. By the end of this guide, you will have:
- Installed the Nillion SDK and set up your dev environment
- Written, compiled, and tested your first nada program using the
nadatool - Plugged your nada program into your first 'blind app' with starter code in cra-nillion
- Connected your blind app to your local nillion-devnet to run it locally
Once you have finished, explore other demo pages in the cra-nillion repo to continue your Nillion developer journey!
Install the Nillion SDK tools
1. Install nilup, the Nillion SDK tool installer and version manager.
Nillion SDK binaries are available for Linux and macOS platforms. For Windows installation, make sure to follow our Windows developer environment setup guide ahead of installing binaries.
For the security-conscious, please download the install.sh script, so that you can inspect how
it works, before piping it to bash.
curl https://nilup.nilogy.xyz/install.sh | bash
Close your terminal. Open a new terminal and confirm global nilup tool installation
nilup -V

// Your output should be similar to the below
nilup 22c84830fff3c86beec27a8cb6353d45e7bfb8a4
2. Use nilup to install the latest version of the Nillion SDK.
nilup install latest
nilup use latest
nilup init
Optionally enable nilup telemetry, providing your Ethereum wallet address. We collect this data to understand how the software is used, and to better assist you in case of issues. In doing this, you consent to the collection of telemetry data by the Nillion Network. While we will not collect any personal information, we still recommend using a new wallet address that cannot be linked to your identity by any third party.
For more information, check out our privacy policy.
nilup instrumentation enable --wallet <your-eth-wallet-address>
Close your terminal. Open a new terminal and confirm global Nillion tool installation with
nillion -V

// Your output should be similar to the below
nilup 22c84830fff3c86beec27a8cb6353d45e7bfb8a4
Create a new folder for your quickstart
Create quickstart, a folder to hold your quickstart project - by the end of the quickstart, the folder will contain 2 subfolders - one for your nada project and one for the cloned cra-nillion starter repo
mkdir quickstart
Create a new Nada project
cd quickstart
nada init nada_quickstart_programs
This will create a directory called nada_quickstart_programs, which is your Nada project. You can read more about the file structure of this new Nada project here
Set up virtual environment
Change directories into your new Nada project
cd nada_quickstart_programs
-
Create a python virtual environment
python3 -m venv .venv -
Activate the python virtual environment
source .venv/bin/activate -
Install nada-dsl from pypi
pip install --upgrade nada-dsl
Your first program
The code for the finished program is below - it is a simple program that has one party and adds two secret integer inputs together.
from nada_dsl import *

def nada_main():

    party1 = Party(name="Party1")

    my_int1 = SecretInteger(Input(name="my_int1", party=party1))

    my_int2 = SecretInteger(Input(name="my_int2", party=party1))

    new_int = my_int1 + my_int2

    return [Output(new_int, "my_output", party1)]
Now we will write it from scratch, explaining how it works as we go. Once we have written the program, we will use the nada tool to run and test it.
- From the
nada_quickstart_programsNada project, cd into thesrcfolder and create a program file:cd src
touch secret_addition.py - Write or copy the program above into this file
Understanding the program you have just written
Let's go through the program line by line to understand what is each part is doing.
-
First we import all from nada_dsl, the Nada language
from nada_dsl import * -
Next we create
function nada_main()- this is the main function that contains our Nada program's code.from nada_dsl import *
def nada_main(): -
Create a party with a name:
Party1from nada_dsl import *
def nada_main():
party1 = Party(name="Party1")This is a single party program, but you could add more than one party; for example we could define
party2 = Party(name="Party2"). -
Create program inputs
from nada_dsl import *

def nada_main():
party1 = Party(name="Party1")
my_int1 = SecretInteger(Input(name="my_int1", party=party1))
my_int2 = SecretInteger(Input(name="my_int2", party=party1))This program has two inputs, both secret integers. Each input must have a
nameand apartyassociated to it. Currently in nada you can only compute on secret or public integers (and rationals by using thenada-algebralibrary). -
Compute on the inputs
from nada_dsl import *

def nada_main():

    party1 = Party(name="Party1")
my_int1 = SecretInteger(Input(name="my_int1", party=party1))
my_int2 = SecretInteger(Input(name="my_int2", party=party1))
new_int = my_int1 + my_int2This performs addition to sum the inputs. Check out all the built in operations available in nada here.
-
Return the output of the program
from nada_dsl import *

def nada_main():

    party1 = Party(name="Party1")

    my_int1 = SecretInteger(Input(name="my_int1", party=party1))

    my_int2 = SecretInteger(Input(name="my_int2", party=party1))
new_int = my_int1 + my_int2
return [Output(new_int, "my_output", party1)]To output the result of a program, we must provide a name - in this case
my_output- and a party to whom the output is provided - in this caseparty1.
Compile, run and test your program
Make sure you are in the quickstart/nada_quickstart_programs directory.
Use the nada tool to compile, run and test the program we have just written. More information about the nada tool can be found here.
-
Add your program to
nada-project.tomlconfig fileFor the nada tool to know about our program, we need to add the following to the to the
nada-project.tomlconfig file.[[programs]]
path = "src/secret_addition.py"
name = "secret_addition"
prime_size = 128 -
Run the
nada buildcommand to compile programs.nada buildThis will compile all programs listed in the nada-project.toml file. You will see the binary files (.nada.bin) outputted to the
target/directory. -
Generate test
nada generate-test --test-name secret_addition_test secret_additionThis uses the nada tool to generate a set of test values, that will be stored in
tests/. Here secret_addition_test is the name of the test, and secret_addition is the name of the program we want to test. You will notice that the test file (tests/secret_addition_test.yaml) is automatically populated with3s everywhere by default. Later, for the test to pass, we will have to change the output from3to the correct output. -
Run the program with test values
nada run secret_addition_testNow we run the program. This uses the inputs defined in the test file (tests/secret_addition_test.yaml) and runs the program and prints the result. Make note of the result, we will need it next.
-
Test the program
nada test secret_addition_testFinally, we test the program. If you run the above command without altering the default values (
Modify test values in3s) in the test file (tests/secret_addition_test.yaml), the test will fail because the expected test output doesn't match the resulting output. Modify the value ofmy_outputin the test file and re-test the program.secret_addition_test.yaml
---
program: secret_addition
inputs:
my_int1:
SecretInteger: "3"
my_int2:
SecretInteger: "3"
expected_outputs:
my_output:
SecretInteger: "6"
nada test secret_addition_test
Well done! You've just written and tested your first Nada program! Now we'll hook this up to a blind app, which will be able to compute with the secret_addition Nada program on secret inputs.
Clone the CRA-Nillion JavaScript starter repo
The cra-nillion Starter Repo repo is a Create React App which has everything you need to start building your blind app. Clone the repo:
Make sure you are in the root of the quickstart directory.
git clone https://github.com/NillionNetwork/cra-nillion.git
Install repo dependencies and run the starter
Before you use cra-nillion, check that you have Node (>= v18.17) installed by running
node -v
cd cra-nillion
npm i
npm start
Open http://localhost:8080/ to see your cra-nillion starter app running locally at port 8080
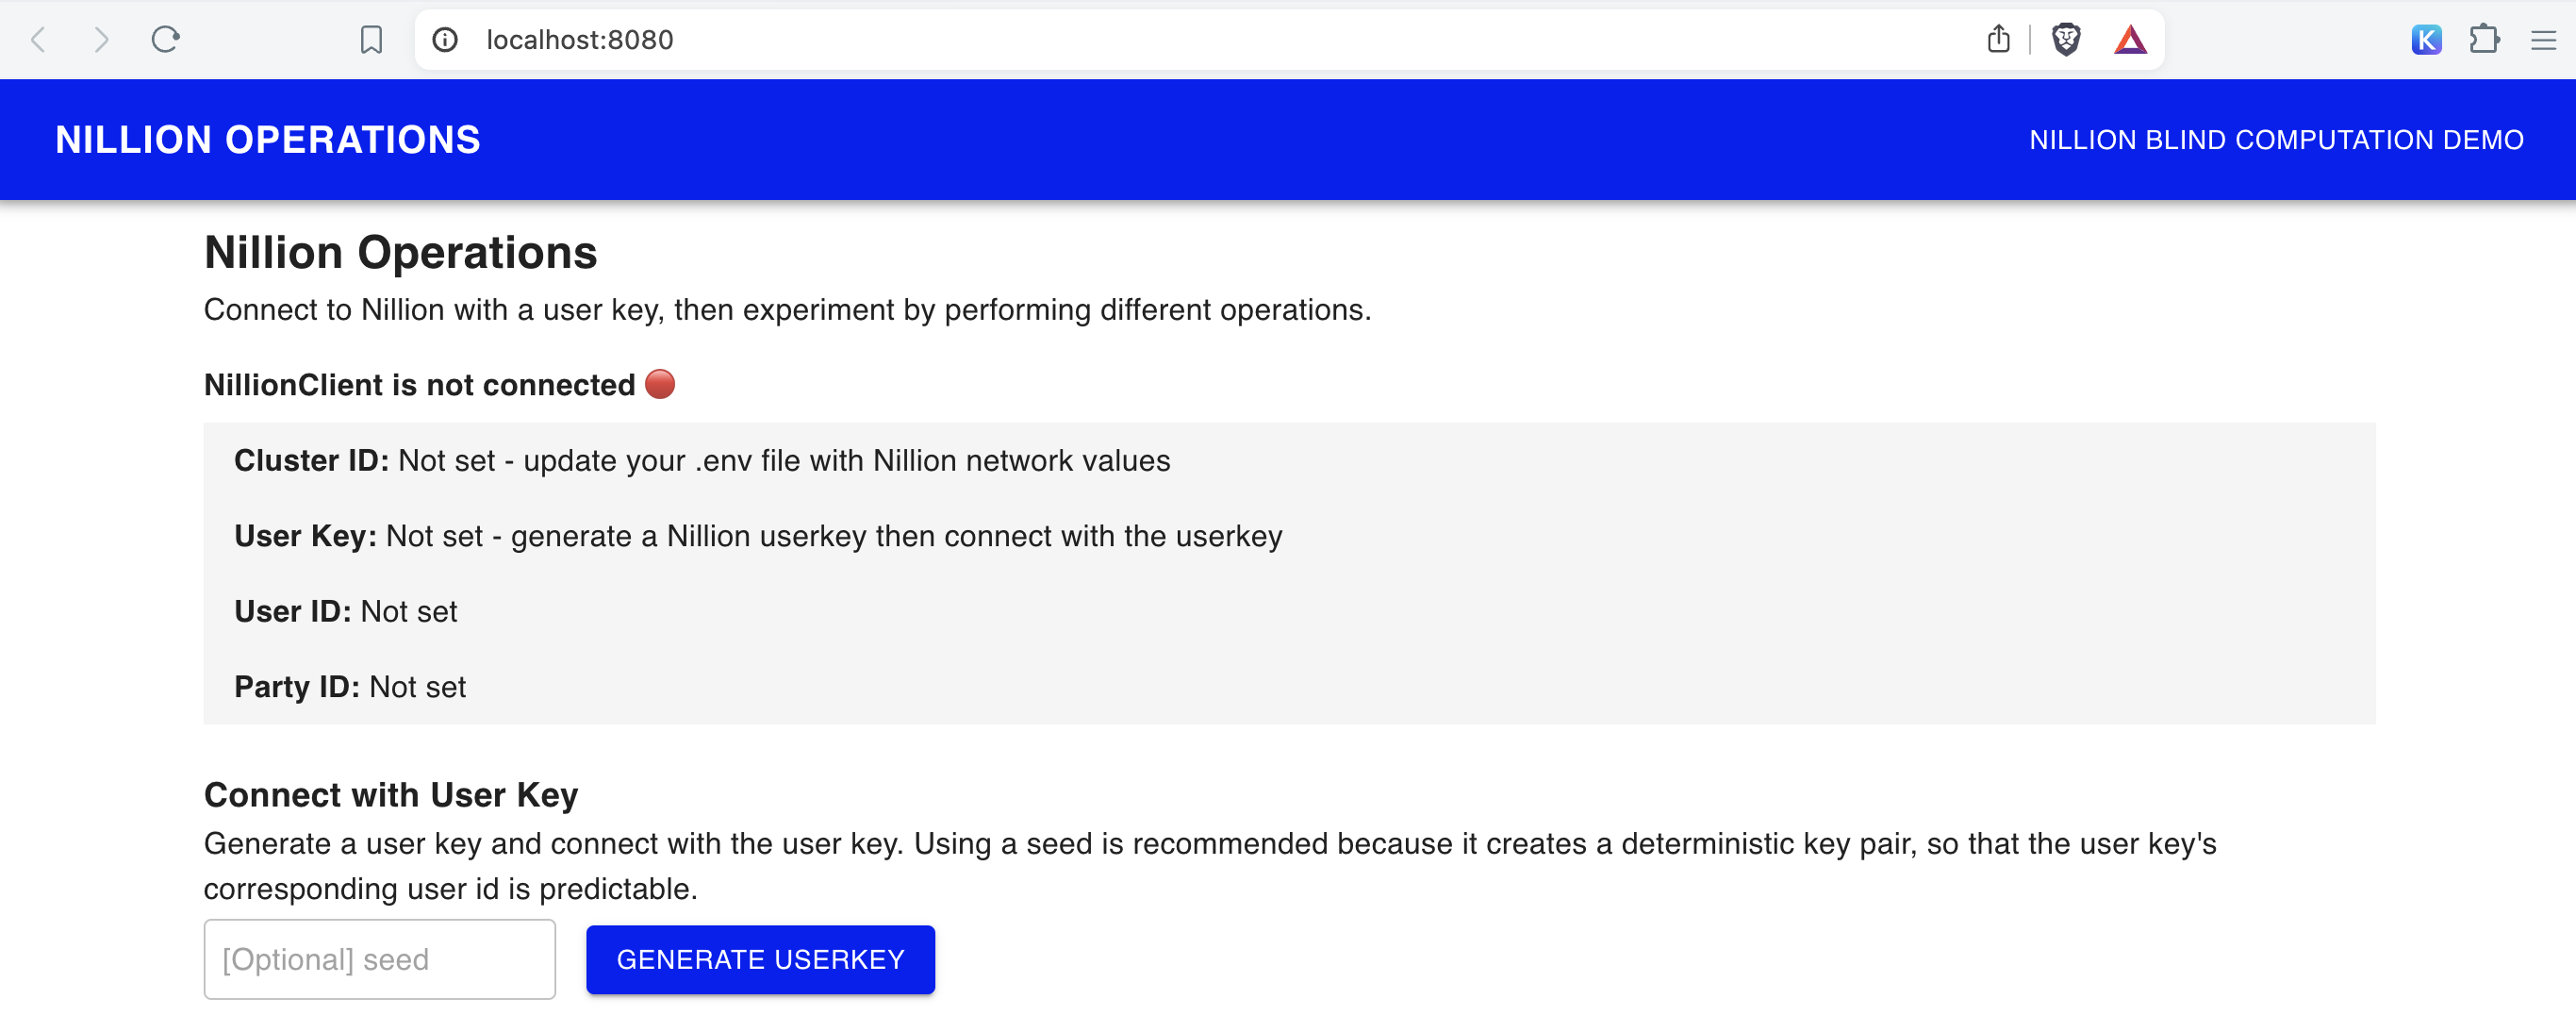
For this Quickstart, we'll focus on the Nillion Operations page and the Nillion Blind Computation Demo page.
Connect the blind app to nillion-devnet
In the screenshot of cra-nillion, you'll notice that cluster id and other configuration variables needed to connect to the Nillion Network are not set, so it's not possible to connect NillionClient.
Spin up a local Nillion devnet
Open a second terminal and run the devnet using any seed (the example uses "my-seed") so the cluster id, websockets, and other environment variables stay constant even when you restart nillion-devnet.
nillion-devnet --seed my-seed
You will see an output like this:
nillion-devnet --seed my-seed
ℹ️ cluster id is 222257f5-f3ce-4b80-bdbc-0a51f6050996
ℹ️ using 256 bit prime
ℹ️ storing state in /var/folders/1_/2yw8krkx5q5dn2jbhx69s4_r0000gn/T/.tmpU00Jbm (62.14Gbs available)
🏃 starting nilchain node in: /var/folders/1_/2yw8krkx5q5dn2jbhx69s4_r0000gn/T/.tmpU00Jbm/nillion-chain
⛓ nilchain JSON RPC available at http://127.0.0.1:48102
⛓ nilchain gRPC available at localhost:26649
🏃 starting node 12D3KooWMGxv3uv4QrGFF7bbzxmTJThbtiZkHXAgo3nVrMutz6QN
⏳ waiting until bootnode is up...
🏃 starting node 12D3KooWKkbCcG2ujvJhHe5AiXznS9iFmzzy1jRgUTJEhk4vjF7q
🏃 starting node 12D3KooWMgLTrRAtP9HcUYTtsZNf27z5uKt3xJKXsSS2ohhPGnAm
👛 funding nilchain keys
📝 nillion CLI configuration written to /Users/steph/Library/Application Support/nillion.nillion/config.yaml
🌄 environment file written to /Users/steph/Library/Application Support/nillion.nillion/nillion-devnet.env
Copy the path printed after "🌄 environment file written to" and open the file
vim "/Users/steph/Library/Application Support/nillion.nillion/nillion-devnet.env"
This file has the nillion-devnet generated values for cluster id, websocket, json rpc, and private key. You'll need to put these in your local .env in one of the next steps so that your cra-nillion demo app connects to the nillion-devnet.
Keep the nillion-devnet running in this terminal.
Create .env file
Make sure you are in the quickstart/cra-nillion directory.
Copy the up the .env.example file to a new .env and set up these variables to match the nillion environment file.
cp .env.example .env
Update your newly created .env with environment variables outout in your terminal by nillion-devnet
REACT_APP_NILLION_CLUSTER_ID=
REACT_APP_NILLION_BOOTNODE_WEBSOCKET=
REACT_APP_NILLION_NILCHAIN_JSON_RPC=
REACT_APP_NILLION_NILCHAIN_PRIVATE_KEY=
REACT_APP_API_BASE_PATH=/nilchain-proxy
Restart the cra-nillion app process
npm start
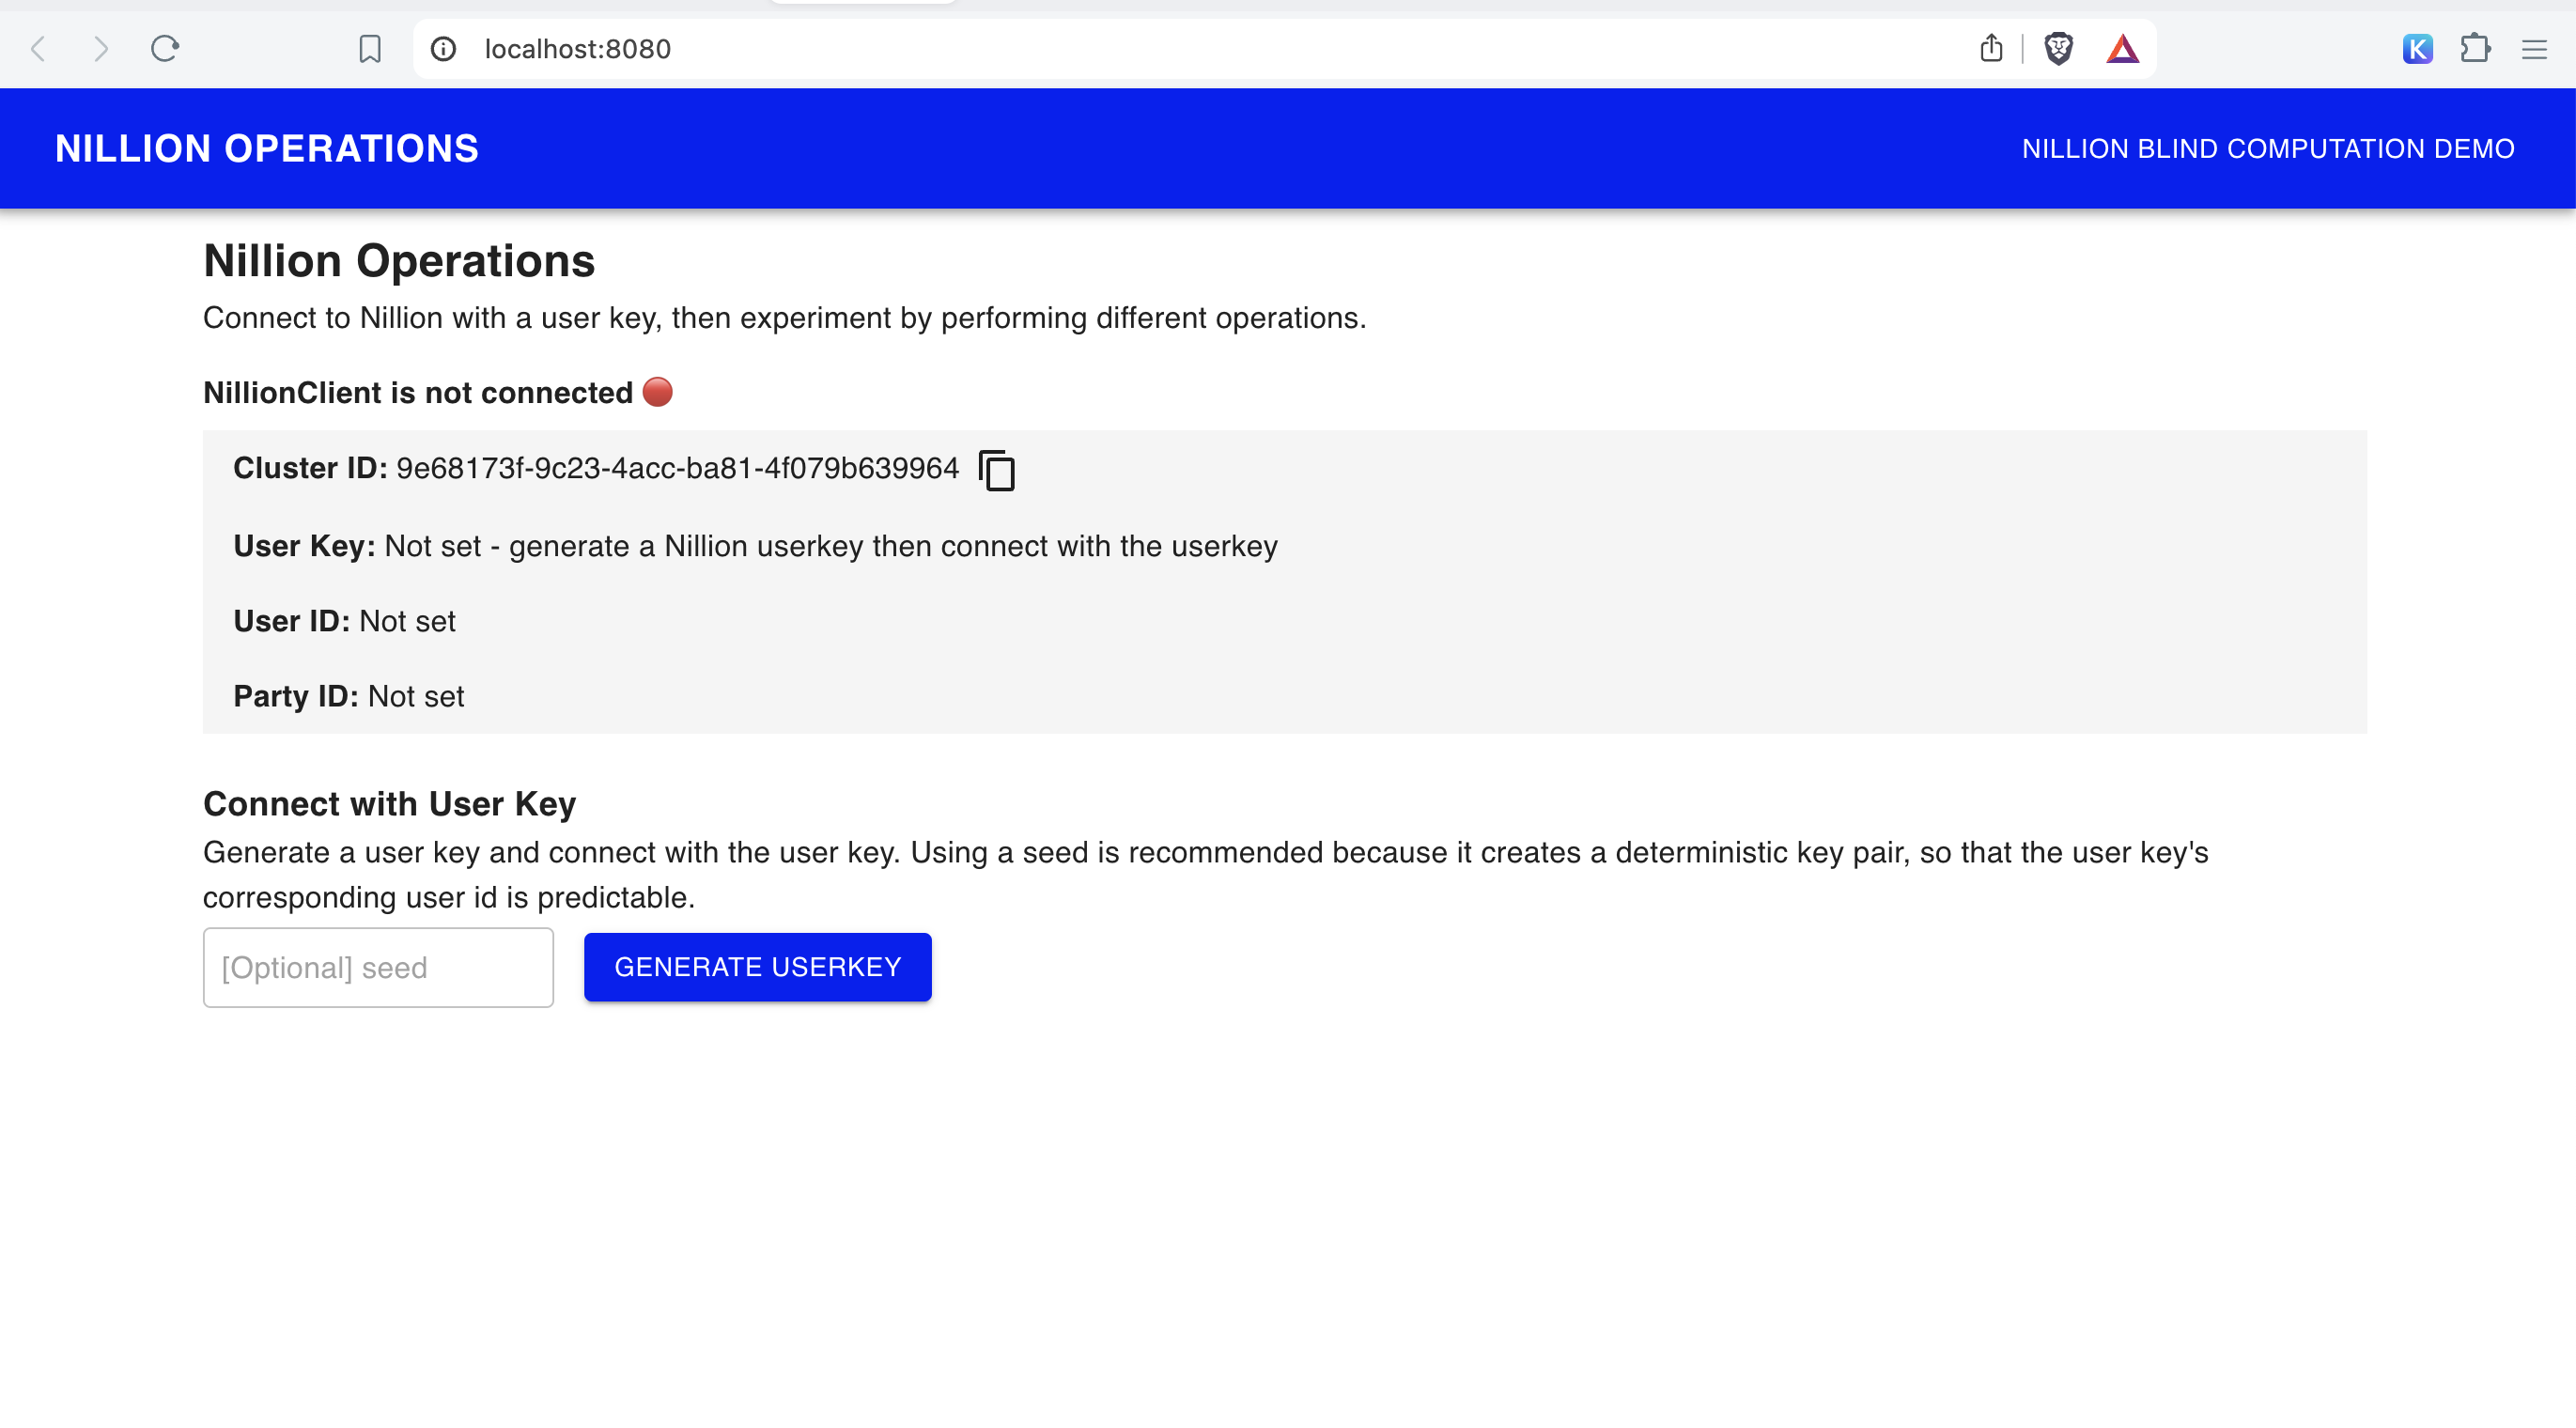
Now the Cluster ID field should be populated with the nillion-devnet cluster id value you set in REACT_APP_NILLION_CLUSTER_ID.
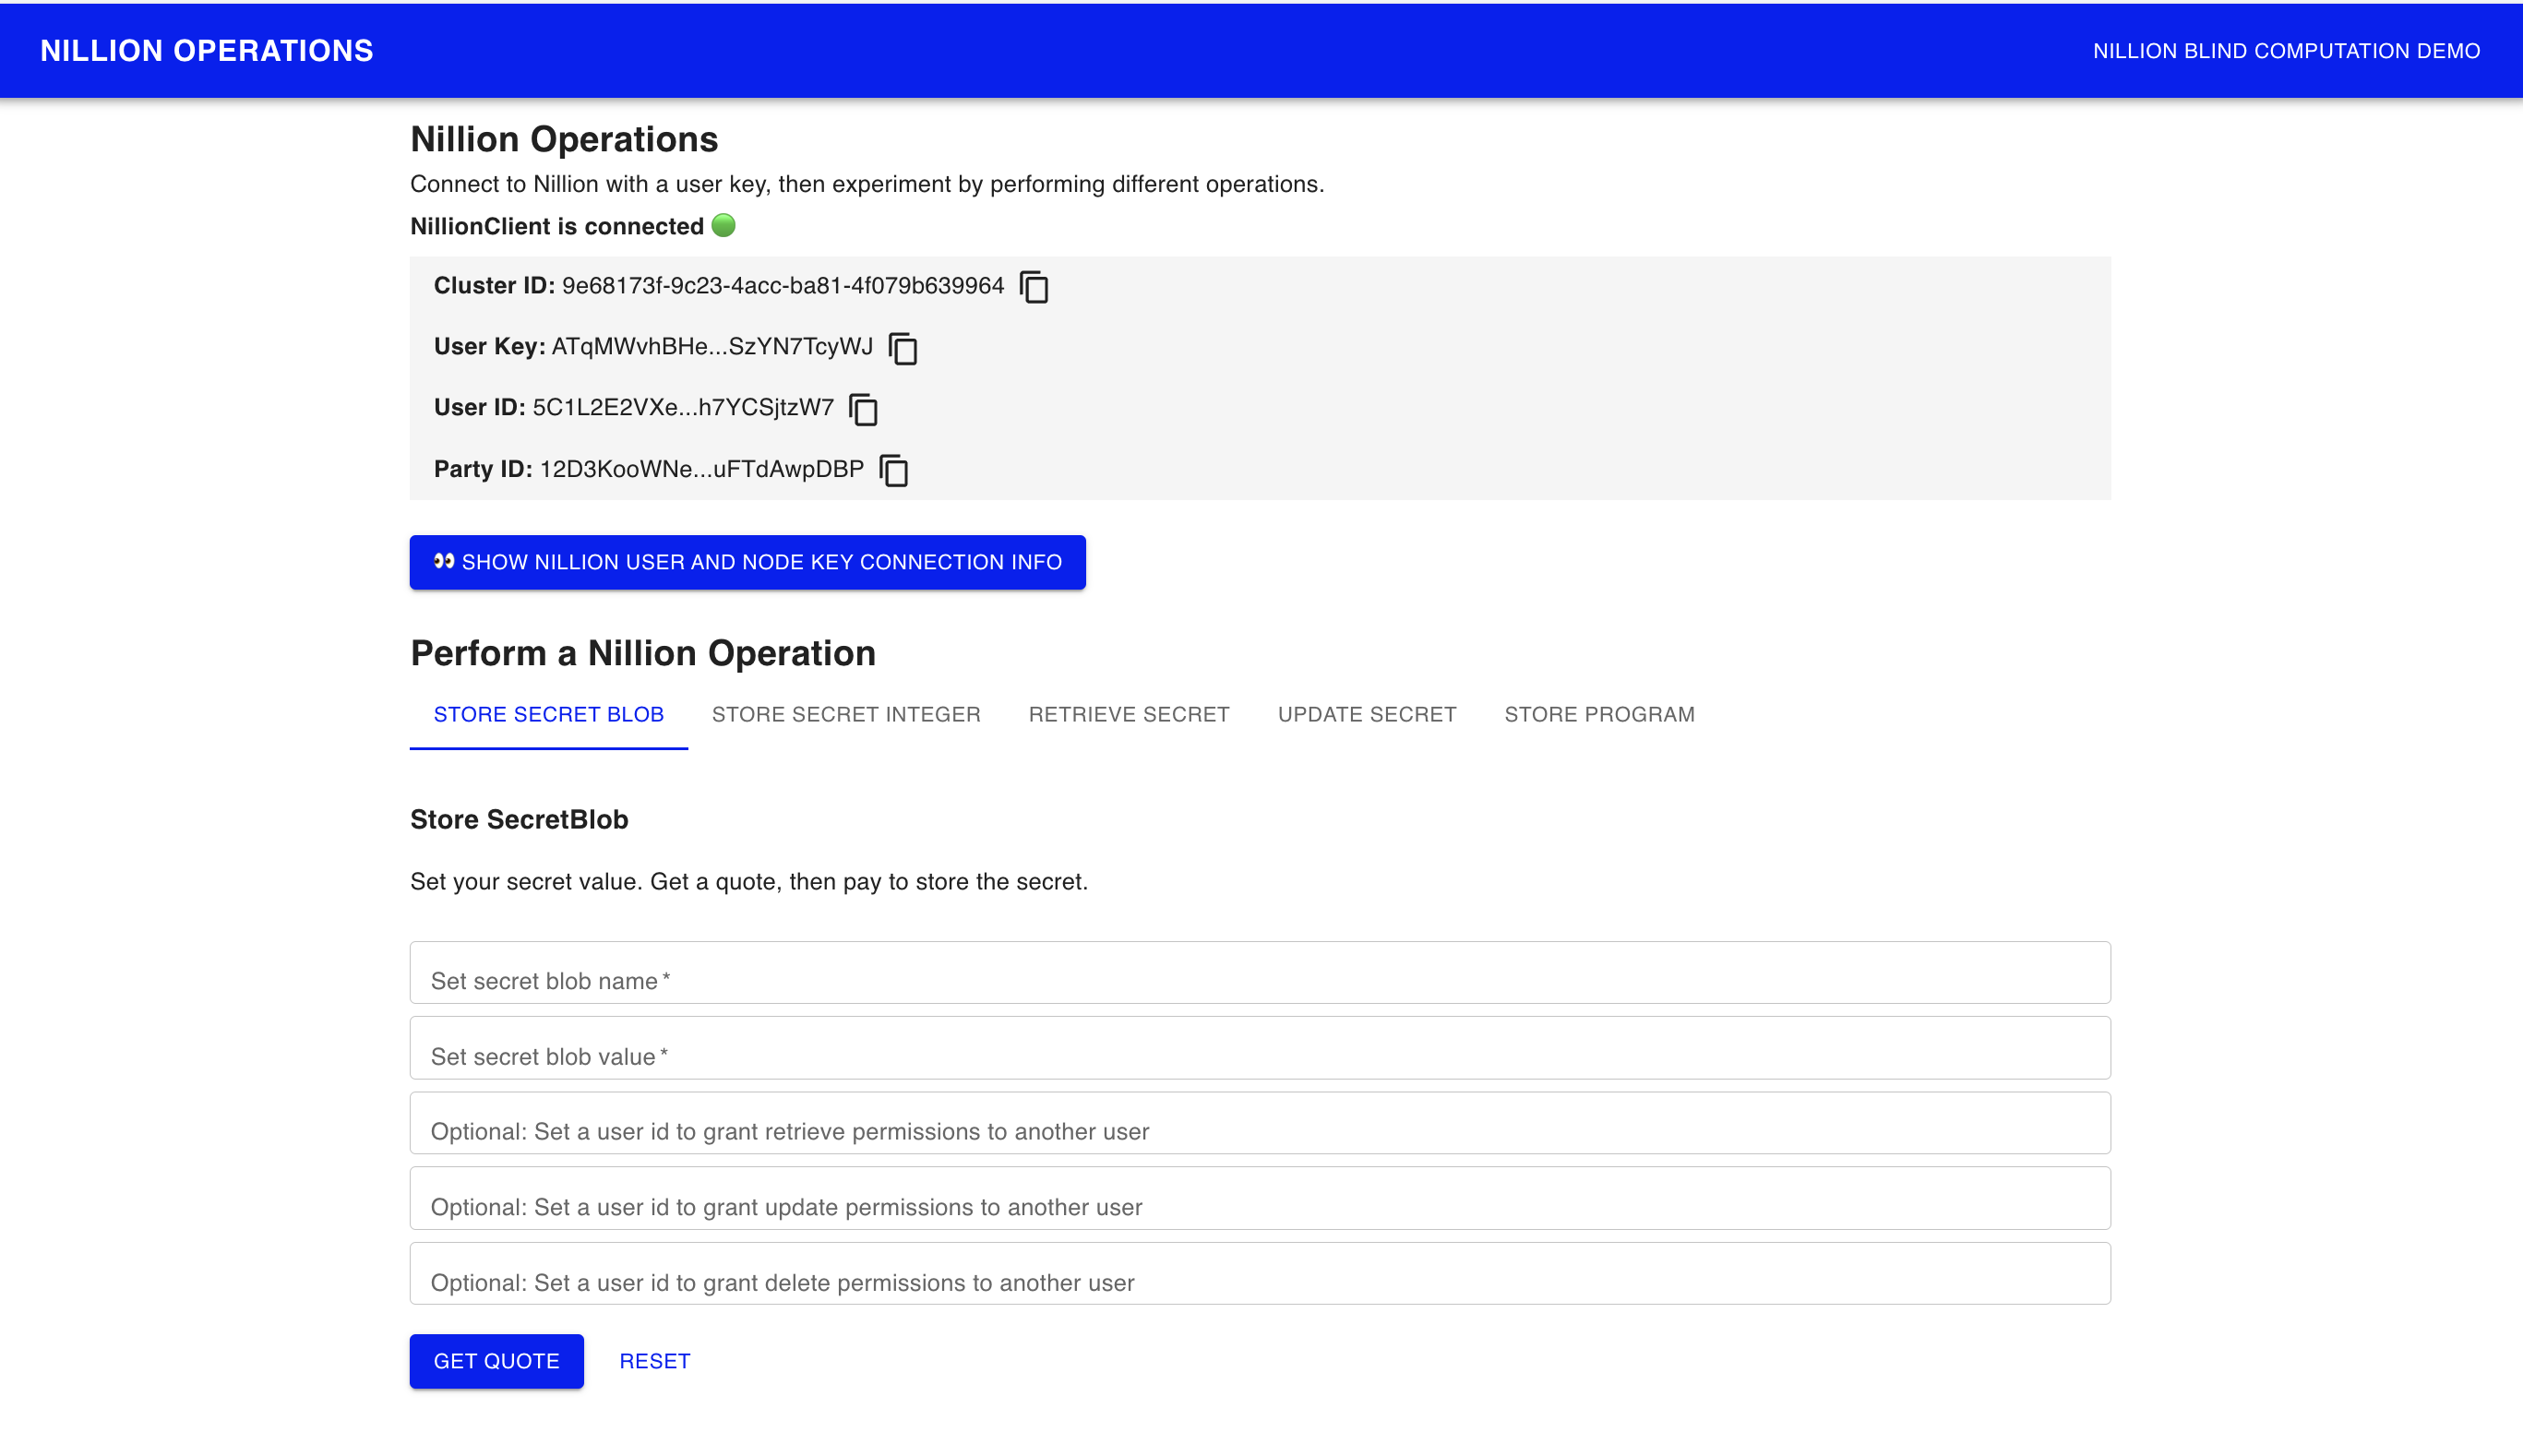
Try out the Operations Page
- Generate User Key - generates a new user key / user id pair
- Connect with User Key - sets the user key and connects to NillionClient via the Nillion JavaScript Client
- Hide Nillion User Key and Node Key Connection Info - toggle button to show/hide user and node key options
- Perform Nillion Operations
To perform an operation (store secret, retrieve secret, update secret, store program, compute), you follow the same pattern:
-
Get quote for the operation
-
Pay quote for the operation and get a payment receipt. On your local nillion-devnet, payments for operations are sent to the local nilchain at REACT_APP_NILLION_NILCHAIN_JSON_RPC are funded by REACT_APP_NILLION_NILCHAIN_PRIVATE_KEY
-
Perform the operation with the payment receipt as a parameter
Hook up your secret_addition.py nada program to your first blind app
Now that you understand how Nillion operations work, let's update the Nillion Blind Computation Demo page to use the Nada program you created.
Navigate to the Blind Computation Demo page: http://localhost:8080/compute
The code for Blind Computation Demo page lives in ComputePage.tsx
const outputName = 'my_output';
const partyName = 'Party1';
Notice that the ComputePage sets outputName which matches the the output name set in secret_addition.py. The ComputePage sets partyName which matches the the party name set in secret_addition.py. There are 2 StoreSecretForm components on ComputePage, with secretName set to my_int1 and my_int2 which matches the the secret names set in secret_addition.py.
- secret_addition.py
- ComputePage.tsx
from nada_dsl import *

def nada_main():

    party1 = Party(name="Party1")

    my_int1 = SecretInteger(Input(name="my_int1", party=party1))

    my_int2 = SecretInteger(Input(name="my_int2", party=party1))

    new_int = my_int1 + my_int2
return [Output(new_int, "my_output", party1)]
loading...
Update programName
In order to run blind computation on your secret_addition.py Nada program, you'll need to make a few updates:
- Open a new terminal and navigate to the root
quickstartfolder. List the contents of the folder
ls
You should see cra-nillion and nada_quickstart_programs folders.
- Copy your secret_addition.py and secret_addition.nada.bin files nada_quickstart_programs into cra-nillion
cp nada_quickstart_programs/src/secret_addition.py cra-nillion/public/programs
cp nada_quickstart_programs/target/secret_addition.nada.bin cra-nillion/public/programs
Now your cra-nillion app can use the nada program and the nada program binaries in store program operations.
- Update programName to
secret_additionso the cra-nillion repo reads your Nada program.
loading...
Run the Blind Computation Demo
Go back to the Blind App on http://localhost:8080/compute and run through the steps on the page to test out the full blind computation flow.
Keep exploring
You've successfully build your first blind app by writing a Nada program, storing the program on the network, storing secrets on the network, and running compute against secrets. Keep exploring by
- reading about Nillion concepts and the Nada Language
- learning how to interact with and manage programs, secrets, and permissions on the Nillion Network with Nillion Client
- challenging yourself to create a page that solves the Millionaires Problem
Open the Nillion JavaScript Client Reference doc in another tab to search for available Nillion Client classes while working with cra-nillion.